Lab 9 - AWS Lambda
Overview #
We are going to live on the bleeding edge and learn how to use a serverless architecture. Serverless is just a marketing term that means you the developer will be using someone else’s server to run your code. Currently there are two big players in the serverless market AWS and Azure. We will be using AWS because it is currently the biggest player in the market and has pretty killer documentation to help us get started.
Task 1 - AWS Signup #
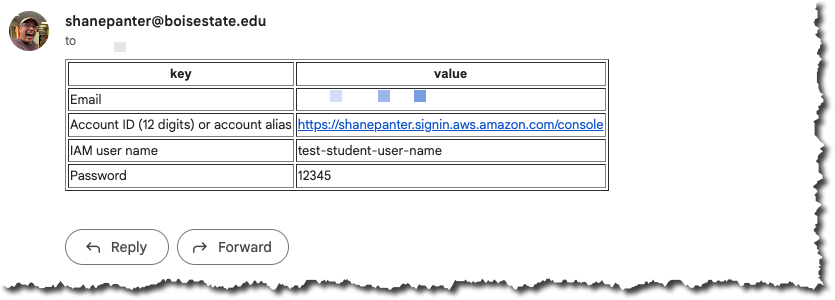
The department has created an AWS account for you with your BSU student email. You don’t have to pay any money or sign up with your personal account. You should have received an email similar to what you see below with your AWS credentials and a link to the sign in page. If you encounter any issues with logging in with your student email please email your instructor ASAP!
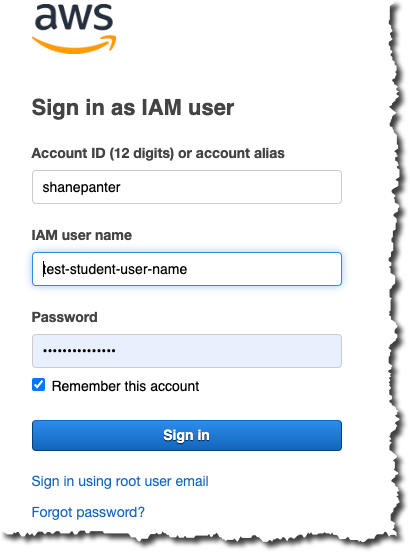
When you sign in the sign in screen should look similar to what is shown below.
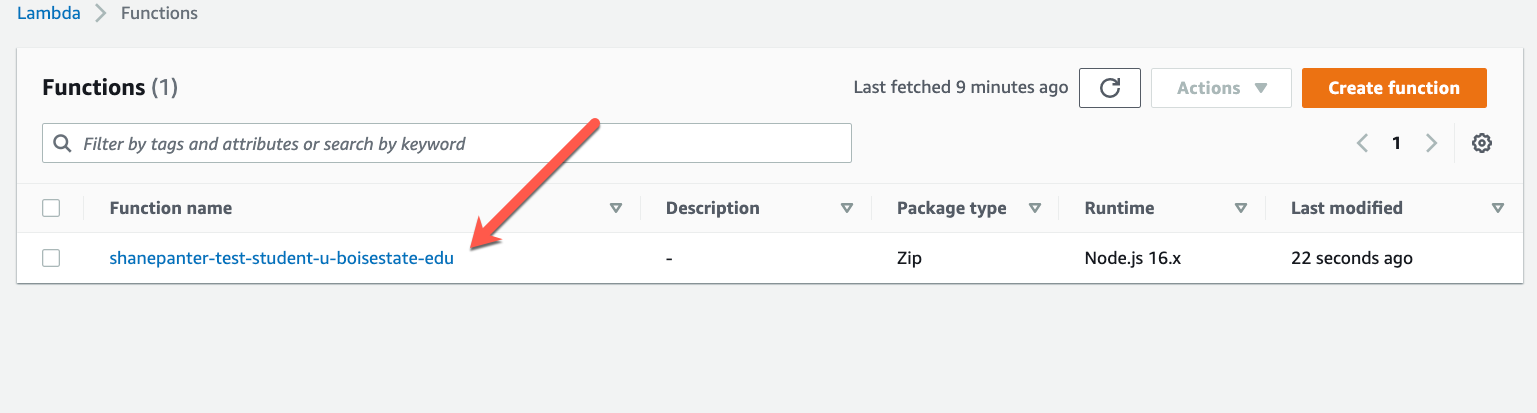
Task 2 - Lambda Console #
In this task, you will create a Lambda function using the console. The Lambda console provides a code editor for non-compiled languages that lets you modify and test code quickly. We will start off by using the console and then will switch to using the command line interface (CLI) for more complex functions.
- Open the Functions page of the Lambda console
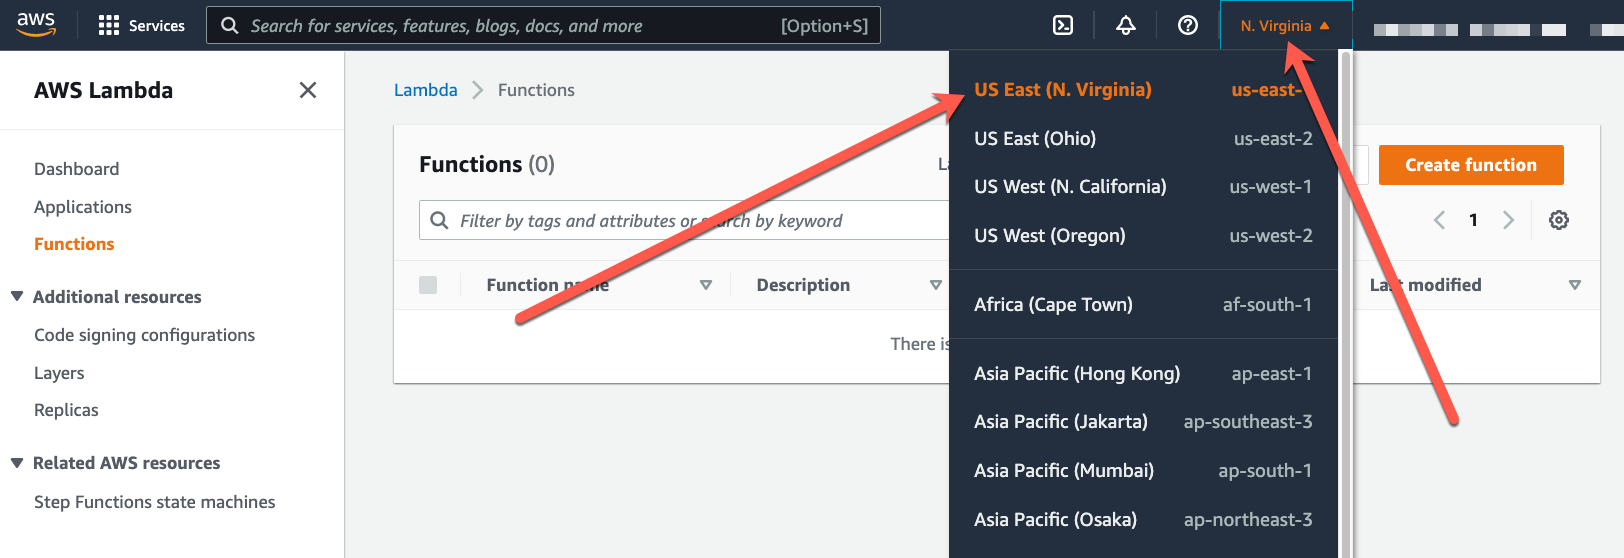
- Make sure the N. Virginia (us-east-1) data center is selected.
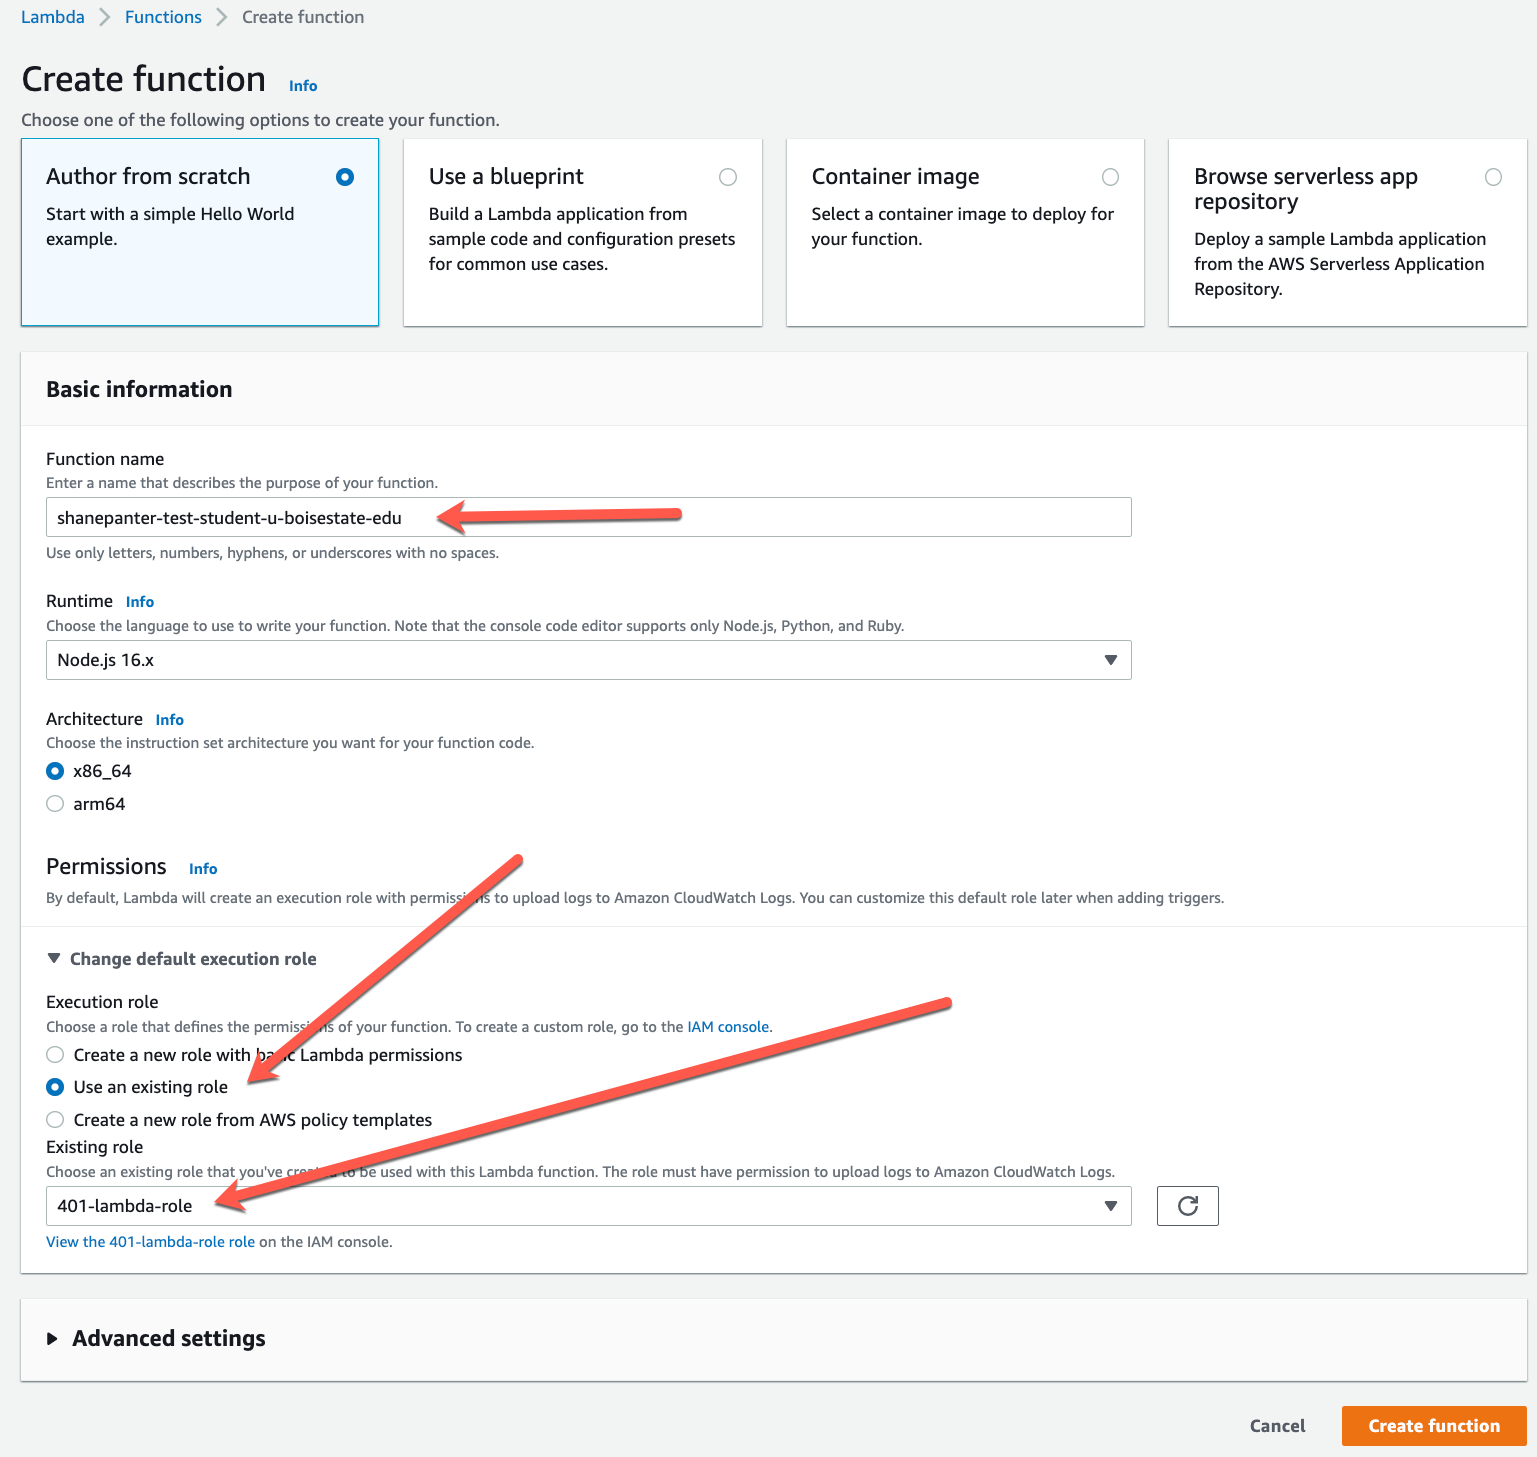
- Choose Create function
- Under Basic information, do the following:
- For Function name, use your student email, for example student01-u-boisestate-edu
- For Runtime, confirm that Node.js 16.x is selected.
- Change the default execution role to 401-lambda-role
- Choose Create function.
Lambda creates a Node.js function and an execution role that grants the function permission to upload logs. The Lambda function assumes the execution role when you invoke your function, and uses the execution role to create credentials for the AWS SDK and to read data from event sources. You should now be able to see your function in the list of functions.
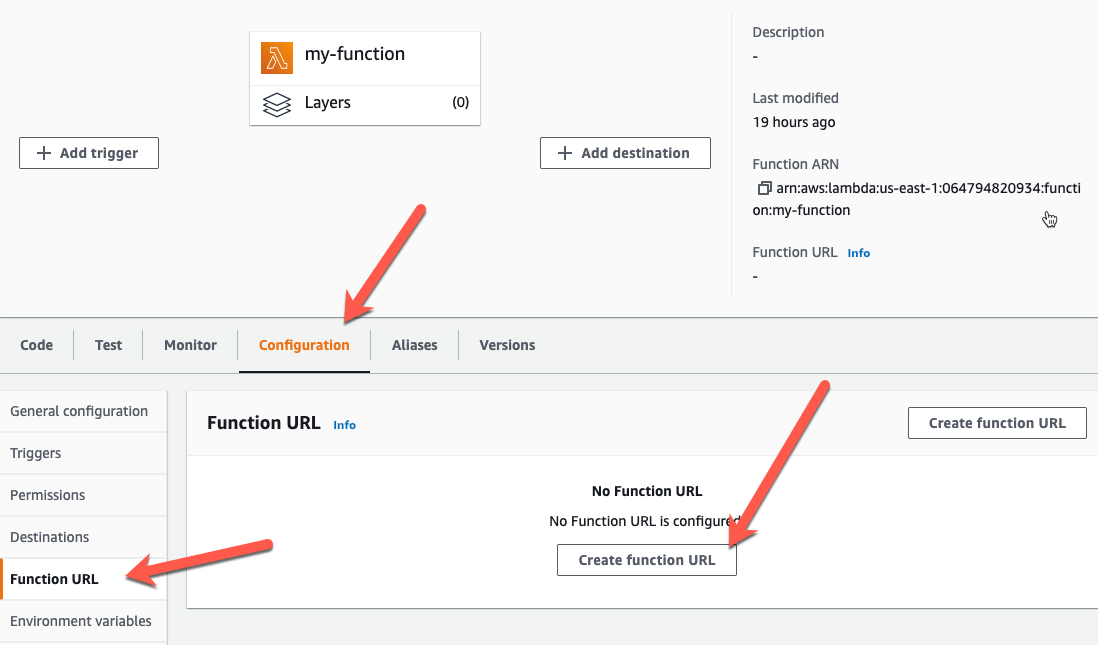
Task 3 - Add a Function URL #
A function URL is a dedicated HTTP(S) endpoint for your Lambda function. You can create and configure a function URL through the Lambda console or the Lambda API. When you create a function URL, Lambda automatically generates a unique URL endpoint for you. Once you create a function URL, its URL endpoint never changes. Function URL endpoints have the following format:
https://<url-id>.lambda-url.<region>.on.aws
Function URLs are dual stack-enabled, supporting IPv4 and IPv6. After you configure a function URL for your function, you can invoke your function through its HTTP(S) endpoint via a web browser, curl, Postman, or any HTTP client. Lambda function URLs use resource-based policies for security and access control. Function URLs also support cross-origin resource sharing (CORS) configuration options.
You can apply function URLs to any function alias, or to the $LATEST unpublished function version. You can’t add a function URL to any other function version.
To create a function URL for an existing function (console) #
- Open the Functions page of the Lambda console.
- Choose the name of the function that you want to create the function URL for.
- Choose the Configuration tab, and then choose Function URL.
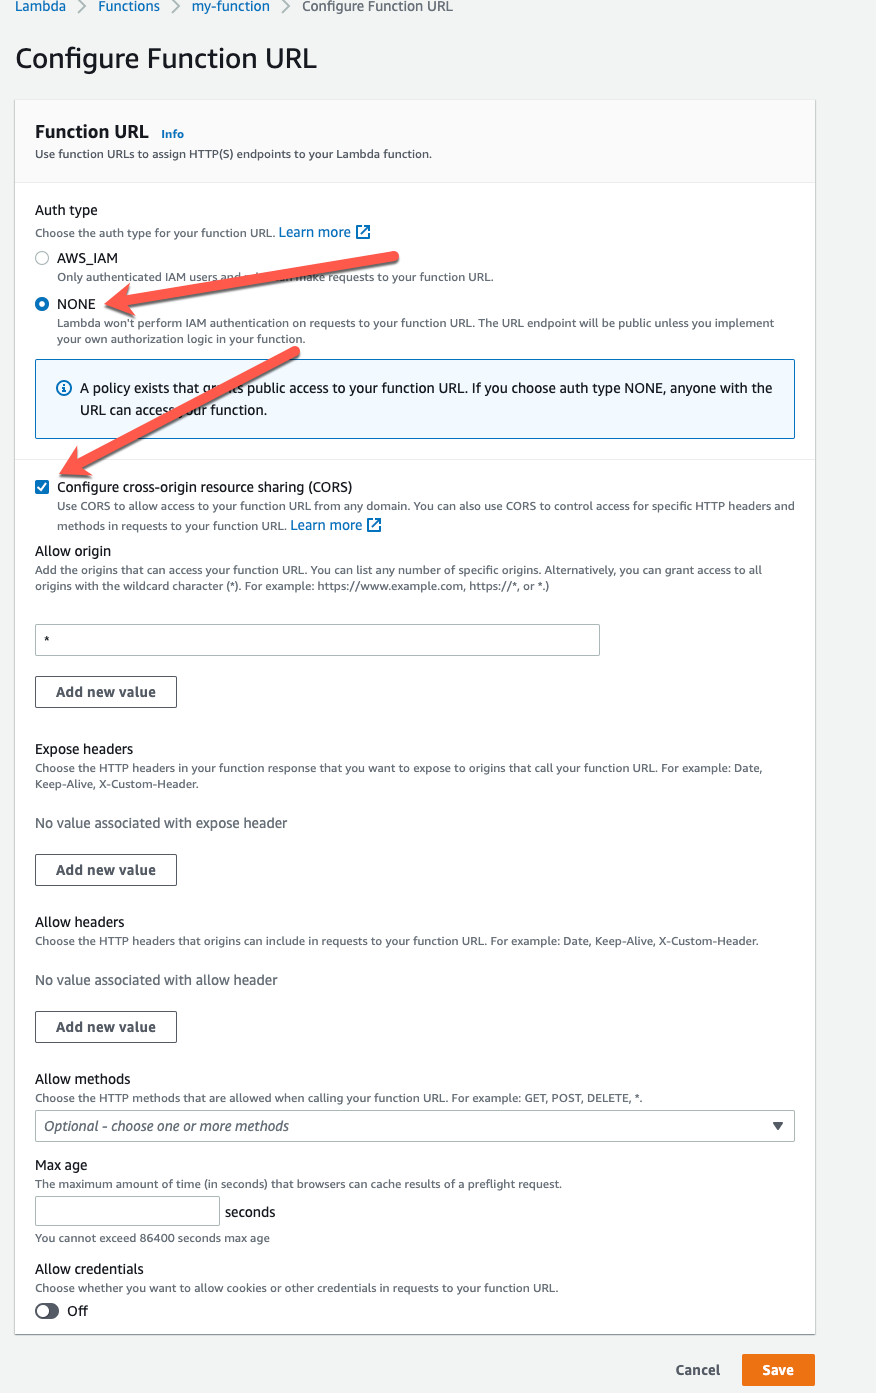
- Choose Create function URL
- For Auth type, choose NONE.
- Check the box to allow Configure cross-origin resource sharing (CORS)
For our simple hello world we are not going to worry about authentication at this point, we can add it later if necessary.
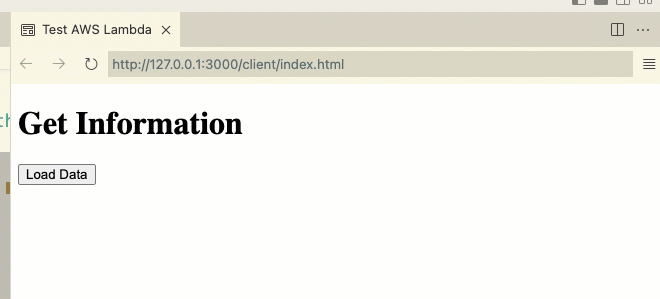
Task 4 - Invoke Function from your localhost #
We now have a function that we can invoke from our local host! Create an
index.html file in your repository with the contents shown below. Replace the
YOUR LAMBDA URL HERE! with the URL that you create in the previous task.
Modify your lambda to return the string “Hello GET” as shown in the screenshot
below.
<!DOCTYPE html>
<html>

<head>
    <meta charset="utf-8">
    <meta http-equiv="X-UA-Compatible" content="IE=edge">
    <title>Test AWS Lambda</title>
    <meta name="description" content="">
    <meta name="viewport" content="width=device-width, initial-scale=1">
    <link rel="stylesheet" href="">
</head>

<body>
    <h1>Get Information</h1>
    <p id="lambda-info">
        <!-- loaded with AJAX -->
    </p>
    <button id="load-data">Load Data</button>

    <script>
        document.getElementById("load-data").onclick = function () {
            let lambda = document.getElementById("lambda-info");
            let xhr = new XMLHttpRequest();
            xhr.addEventListener("load", function () {
                lambda.innerHTML = xhr.response;
            });
            xhr.open("GET", "YOUR LAMBDA URL HERE!");
            xhr.send();
        }

    </script>
</body>

</html>
You now should be able to load data from your AWS Lambda function when using the live server preview in VSCode. This will NOT work if you just open up the file in your browser, you MUST use the live preview as shown below!
It didn’t work #
If you can’t find what you created look through all the AWS regions to see if
you maybe used the wrong region. The AWS console defaults to US East (N.
Virginia) us-east-1, make sure you are in the correct region.
If you have completed everything and your code doesn’t work you may have missed a step. At this point instead of trying to figure out what went wrong it is easier to just start over from scratch. Follow the steps below and then try again.
Delete your Function #
- Open the Functions page of the Lambda console.
- Choose YOUR function.
- Choose Actions, Delete.
- In the Delete function dialog box, choose Delete.
- Got back to step one and try again 😊
Task 5 - Add Files (5pts) #
For this lab you need to check in the completed index.html file that you created that has the AWS lambda function URL and all the other files that you updated when configuring your code.
Task 6 - Flipgrid (35pts) #
Most of this lab was just configuring everything, so the majority of your grade will be you showing off everything working in a video. Once you have everything ready create a video using flipgrid!
You need to demo the following:
- Show your completed Lambda function on AWS
- Show your simple web page that invokes the function
Task 7 - Complete the Retrospective (10pts) #
Once you have completed all the tasks open the file Retrospective.md and complete each section with a TODO comment.
Github Classroom #
All of your Lab work will be submitted through Github Classroom. You are responsible for ensuring all your code is properly pushed to Github! Any code not pushed to Github by the deadline will not be accepted under any circumstances. If you don't already have a GitHub account you will need to create one.
Accept the assignment #
- Get the Starter Code
- When you accept the assignment it is critical that you select your student email address from the list. If you don't select your student email address your instructor will not be able to grade your code. If you can't find your email in the list, contact your instructor ASAP to get the issue resolved.
- Make sure to save the GitHub URL so you can find your assignment later if needed!
- Once you accept the assignment it should show up in the class GitHub account